Exporting the Data
By default the data stored by the system can be exported on the command line. There is also an option to configure the system to expose two specific tables from the database via an API. This can be useful for quick checks on the judgements or for running continuous analysis on the results.
Command Line Export
The data in the database can be exported using the following command.
flask --debug export
This will export the database contents to a zip file containing one csv file per database table. The file will be saved at the location configured in the exportPathLocation key in the configuration file.
There is also an option to export the data to a zip file of tsv files rather than csv files.
flask --debug export --format=tsv
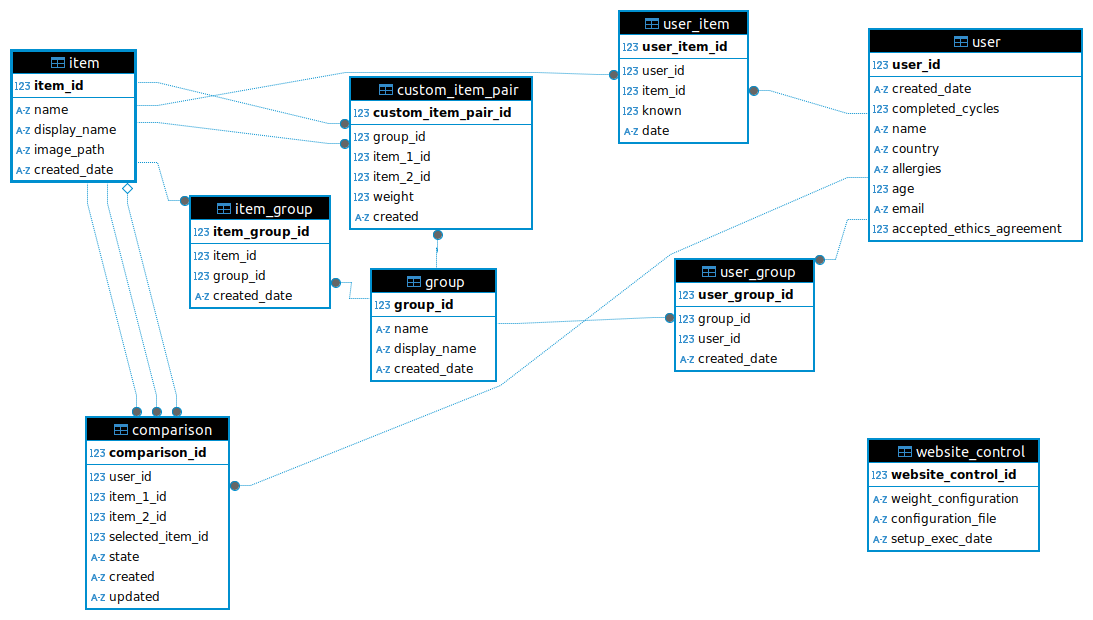
The database structure is shown in the diagram below. The key tables are user, item and comparison. The user table stores information about the user, the item table contains information about the items (or images) being compared and the comparison table contains the information about the judgements. The other tables mostly serve to make connections between these main tables. For example the item_group table contains information that shows which items belong in which group (the details of the group such as the name are in the group table) and the user_group table shows which users know which groups.

In addition to the tables from the database a outcome table is also generated from the data in the comparison table. For all non-skipped comparisons it adds a row with the two item ids and the outcome for the comparison.
The outcome data are:
- 0 if item 1 was selected
- 1 if item 3 was selected
- 2 if the comparison was tied
This data is in a form that can be directly input into the Bayesian Spatial Bradley–Terry model BSBT analysis.
API
There is also an option to expose the table containing the decisions made by users (no user details), the outcome table generated from those decisions and the table containing the item details via a secured API.
To enable the API:
- set the
API_ACCESSvariable in theconfiguration/flask.pyfile toTrue - create a file at the top level of the repository which should contain the secret key which will be used to authenticate API calls
- set the
API_KEY_FILEvariable n theconfiguration/flask.pyfile to the name of the file containing the secret key (the default is.apikey)
Once the API is enabled the three tables can be accessed at the following urls:
- http://localhost:5001/api/judgements
- http://localhost:5001/api/items
- http://localhost:5001/outcomes
To access the data in the API requests must use the secret key to authenticate. All programming languages will have support for this. The following two examples show how to access the API from a command line using curl and using an R script. These scripts include the API key in a raw form to keep the examples simple. When writing scripts to access the API you will need to be mindful of how the key is stored in the scripts themselves. The key should be passed into the script in a secure way such as using your operating system keychain or using an encrypted file.
An example using the command line:
curl -X GET localhost:5001/api/judgements -H "x-api-key: my_secret_api_key"
An example using R to read the data into a data frame:
library(httr2)
req <- request('http://localhost:5001/api/judgements') |>
  req_headers('x-api-key' = 'my_secret_api_key')
data <- req |> req_perform() |> resp_body_string()
df <- read.table(text = data, header = TRUE, sep = ',')
